|
In the 21st century, real estate business is growing rapidly. The important thing is the business is diverting into the online platform. The more it is moving into the online platform the more important fact is becomes the photos. It will be not mistake if some mention photo is the key to success in Real Estate business. The thing that can help you in this case is Real Estate Photo editing Service. 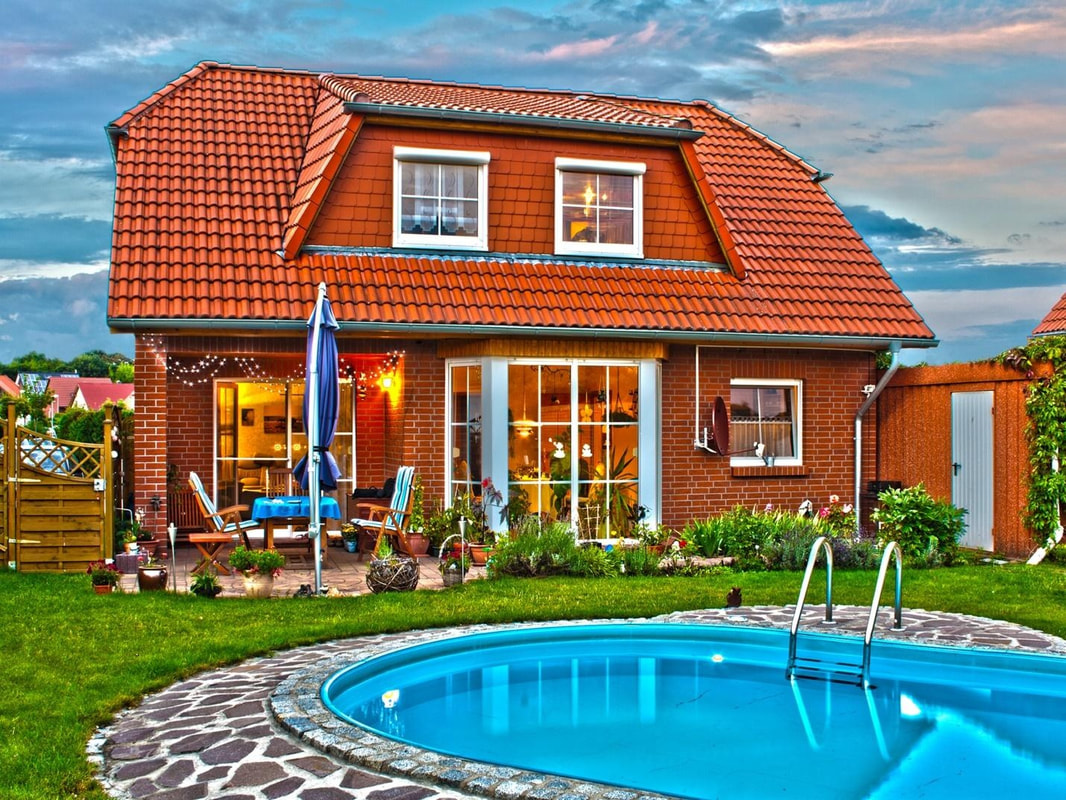 By talking this service you can attract significant number of audience. If you are associated with this field I hope you know the value of attraction. First impression always matter. You have to implement something special so that the first impression comes in a positive matter. That’s the key and photo is the route to this key. So the thing is you have to use a photo that is well enough to catch the attraction at first sight. That’s why you ought to use professional Real Estate image editing service. Clipping USA is the best one at this point. Let me inform you why you should choose them. There are many types of special effect to apply for Real Estate Photo that CUSA is offering. Let’s see at a glance. Greenery Attachment: People love to see natural thing. So, adding some green scenery can bring a mesmerizing look in the photo. This is a great method to attract a huge audience. Who doesn’t love to green scenario? This is a great way to bring a fresh look in the photo. Especially when your photo is looking gloomy you should afford this service for your photo. CUSA is specialist at for this area.  Live People Attachment: Without any types of living object the real estate photo becomes depressed and gloomy. So why not add some live people in the picture? From this thinking Clipping USA has started this type of altering and effectively it is providing good results for those who have taken this service. Sky Attachment: Sky is the life of real estate photography. But the unpleasant thing is we need to depend on whether to get an attractive sky. With this method you can apply the sky as you like in the photo. Cloud, Sunny, blue or pink any kinds of background that you are willing to use CUSA is able to deliver. Sometimes the sky's the only thing that becomes the cause of looking a photo spiritless. You should put focus on sky. Furniture Attachment: At the time you are showing inside the Flat without any furniture it looks pale. Adding some furniture by altering can prove to be an effective technique. This is a must use service for the inside view. Or you have already set up the furniture but they are not arranged nicely? Arranging them manually will be time consuming and stressful task. Instead of that fix your real estate photo with taking photo editing service will be a smart option. Wallpaper Optimization: Sometimes there are distracting wallpaper remains in the real estate photo. This service is for eliminating that wallpaper and makes them eye catchy. Wallpaper optimization is the top notch for erasing the wallpaper.  These are not all, there are some others service also available for the editing of real estate photo. Allow me to elaborate: Some sorts of Photoshop adjustment is must need for every particular real estate photo. PS adjustment includes White balance fix, Color Correction, Sharp and exposure fixing, Contrast and light modification, Color Cast erasing, Noise and blur correction, crop and resize, Vertically and Horizontally Leveling if needed. Removing dust and sky adjustment is also needed.  There are some advances types of image altering services are also offered by clipping USA let’s see at a glance.
It can be said that, CUSA is a complete package for any types of Real estate photo editing services. Consequently, if you have not tried their service yet, you should try. Otherwise, you may have to regret later. You can judge their service quality with a free trial now. It is totally free. What is the delay then?
3 Comments
Hello everyone, do you know the secrets of professional photographers about their photo editing process? Only a few people know about this process. In this article, I am going to reveal what do professional photographers use to edit their photos. So, after reading this post you will be able to alter photos like a pro. So, let’s begin. At first, I am making a point clear here. Don’t think that there is any specific rule that every photographer follow. Different Photographers have different types of method. I am here to provide you a common overview that will definitely help you to think like a pro. The most important factor about professional photo editing software. Without a handy image editing software thing will be really difficult for you. So, the mandatory thing is to pick the right software. Most of the professional photographer using these softwares for their task: -Adobe Lightroom -Adobe Photoshop -Affinity photo -Corel PaintShop Pro -Luminar Another thing you ought to keep in mind that, professional photographer never edits their photo too much. They try to make in natural. While capturing the photo they are not just taking a scene, they capture moments. So, what’s the basic rule they follow? Always capture the photo in Raw file that will keep the resolution the same. After copying the raw file in Computer device open them using Adobe Picture Raw: 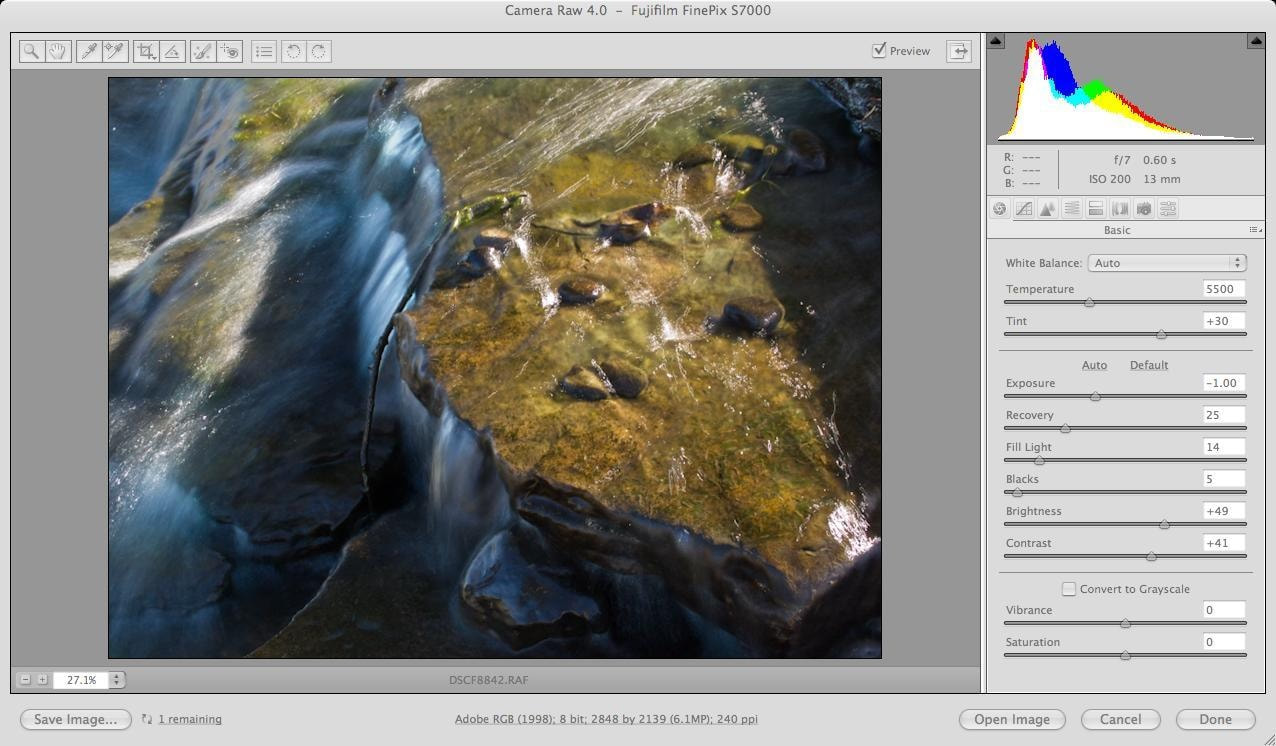 Adjust brightness, light, vibrancy, saturation etc from here. After this step, open the photo using Adobe Photoshop or other software that mentioned above.
Then perform additional editing like removing an element, fixing spot, adding shadow, smooth and change color etcetera after doing this step save the picture in jpeg high quality. If you need to crop the image, don’t perform the action in Photoshop. Fast-stone image viewers are my preference at this point. From my experience, it gives better result that adobe Photoshop for resizing. The final thing is the copyright info. As a professional a professional you need to use it so that no one can use your photo without your permission. Use Exit tool-gui to utilize copy-mask. That’s the procedure professional photographers used to edit their Photo. Some of the intelligent photographers never spend their time on editing photos. They simply hire professional image editing experts or Company like Clipping USA. It’s really worthy. 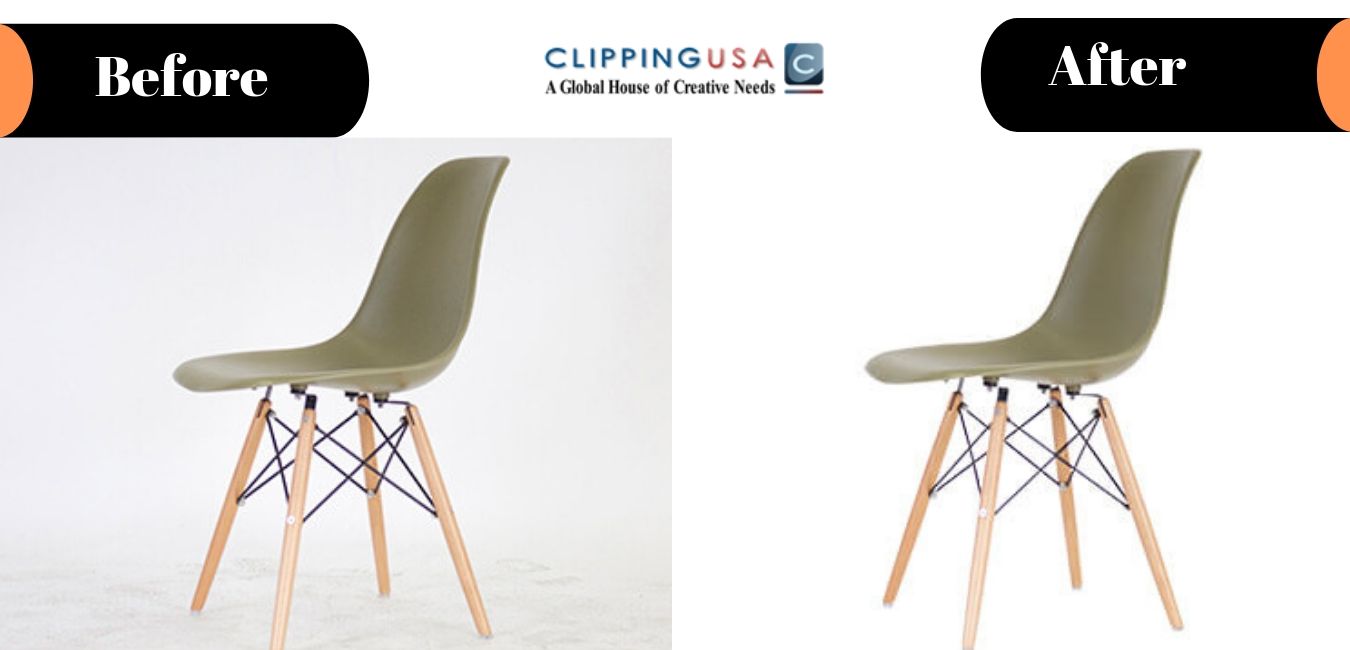 Background removing technique is getting familiar day by day. It has given lots of varieties and flexibilities to the photojournalist and other people connected with photo. In the past, people often feel disordered about background. To remove unnecessary was a time consuming task. They need to capture the photo again in order to remove elements.
Background removing service has changed this scenario. With the help of this image editing service removing the background and other needless element is not a big deal anymore. So, basically it is the procedure of confiscating a background and separates its object. Photographer and E-commerce business owner are mainly using this service. Lots of photo editing softwares are available to perform this image altering. Some of those are Adobe Photoshop, Adobe Lightroom, Skylum Luminar, Corel PaintShop Pro, Affinity Photo, GIMP etc. The main reason why so many people are adopting this is its attention catching technique. The main thing is you need to carry viewers’ attention to get conversion in E-commerce business. So, it is crucial to present the product in an attractive way. What can be a greater way than white background? Removing background from an image gives you exactly the same option. Easily one can delete the background and put them in a new background as requirements. Allow me to demonstrate you the basic procedure of this. If you want to perform this method in Photoshop, choose a selection tool after opening the image. Then make the choice of the object and inverse the choice from select option in the above. Choose you expected color from background color picker at the bottom left. Then erase the background with delete option. That’s the basic concept. 7/20/2019 0 Comments Digital Photo Retouching ServiceNowadays, photography field has become much more competitive than you think. To survive in this competitive photography field one must need to do something special after taking photos. So, what can be done with photos to make it special? 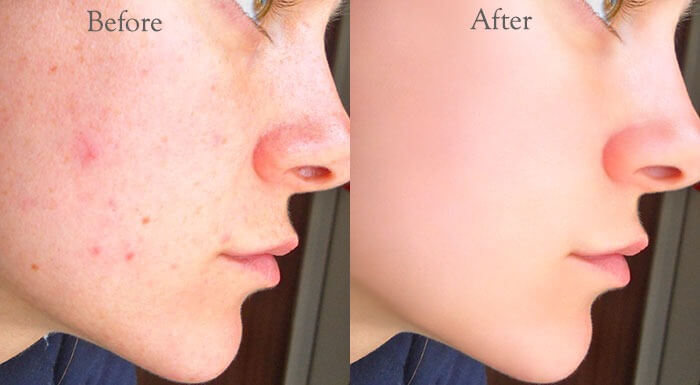 Digital photo retouching service will give you the exact professional touch that you are expecting. Whenever it is wedding photography, Birthday or modelling, photo retouching services will make them extremely appealing by fixing different elements of the photos like.
By adopting this service you can get the frame that you are looking for. If you are a photographer or model and struggling to get the expected look in your photo, you should try this service. But from where you should take the service? As per my recommendation, it is tough to find anything better than Clipping USA. This is the perfect place to get the expected result. Let me highlight why I am suggesting CUSA:
Free trial option is available there. It will be a smart option to take a free trial right now. It will not cost you any money it’s free and no commitment is needed. So, why shouldn’t you use it? After taking a trial, it will be easier for you to get an idea about their working standard. Product photo is one of the most key foundations of your Business. We try to do every single thing that is in our hands to look the photos more interesting. Do you want to make your product photos more appealing and eye-catching? Adding smoke to your product photos will do the trick. Adding fog and smoke bring a royal and dreamy look in your photo. It can force its viewers to stop and see the product picture. What can be greater thing in business than that? By reading this article you can know how to add fog and smoke in your product photos. Before I start, let me inform you that Adobe Photoshop CC is used for this technique. Let’s know the procedure step by step. 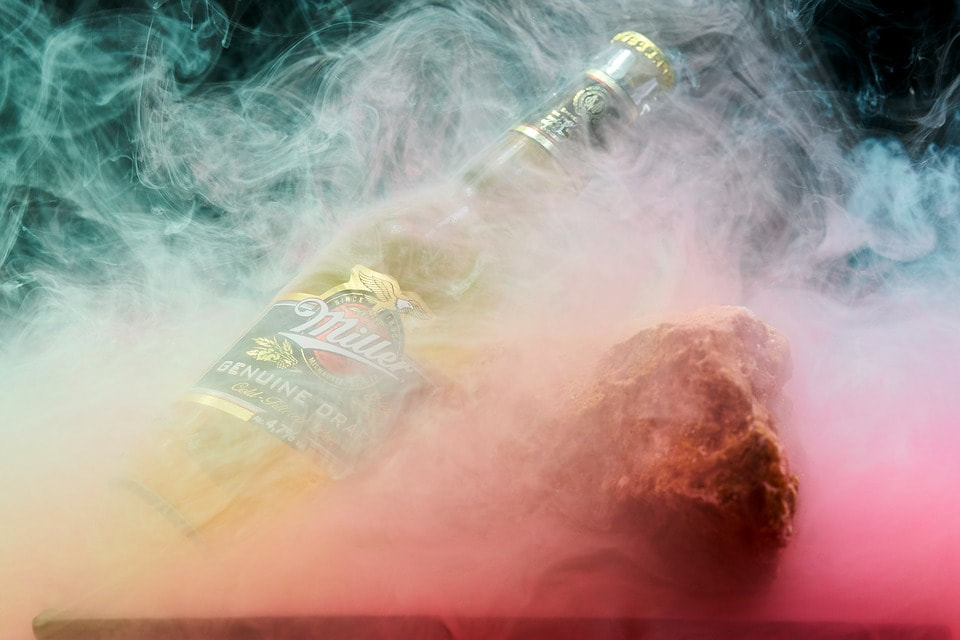 Step 1: Adding Glow At first, start by opening the image that need to revise in Photoshop. Then click on the background layer from the layer section and choose Duplicate layer. After this you can rename the coating into Add Glow that will make your job easier. Then go to blur option followed by Gaussian Blur and save the radius to 15%. In the next, you have to modify the layer by changing its blending mode into soft light and decrease the opacity to 65%. Step two: Adding vignette The primary task of adding glow is over. Now you have to add vignette to the photo. Considering this creates a new layer from the below and rename it to add vignette for identify the layer. Next, jump to the fill preference and choose 50% gray. At this stage, it will be noticeable that total photo has become gray. Don’t need to be worry about it. Go to filter option followed by the lens correction. Choose vignette from there and set its value to -100 and choose midpoint number +10. Then you have to set the blending mode of Add Vignette layer into hard light. Step three: Adding the smoke At this stage, it’s time for adding shadow. Create a new layer and rename it as add smoke. Then go to render option followed by Clouds. Go back to the layer and customize it as Converts to smart object. At this point you have to set the color blending mode into screen. Then press CTRL+T to transform freely. After this you have to transform the layer along with scaling it from the top. After this drag and position the smoke into a perfect position according to your object. Then change the blending mode once again from normal to overlay. Final step: Merging layer You are almost at the finish line. Click on the Add Vignette layer and choose duplicate layer. Formerly, drag it up with the Add smoke layer. That is it buddy you have done it. Now, save the picture according to your required file format. Hope you enjoyed it. Now allow me to give you some bonus tips that will help you to add fog and smoke in more eye-catching way. Let’s jump forward. Thing to Follow:
Do you want to make your photo look much better? Background remove and image masking are two things that can bring an extraordinary look in your photo. Background remove and image masking are two useful techniques to use for any kinds of photo. In this post, we are going to discuss about background remove and image masking specifically. Allow me to start with background removed. Perhaps it is the mostly used image editing technique nowadays. Especially, in E-commerce business and product photography it is using in every case. In product photography, you can’t use a colorful background. It is suggested by experts to use a white background for Product photography.  Background Remove Moreover, Amazon and Ebay has set mandatory rules for using white background. It is the proven way of catching attention effectively. But taking every photo in white background is not an easy task at all. What is the solution here? Background remove is the perfect terms here. After the introduction of background remove, you don’t need to take every photo in White background. Take your photo in any background like you want. Just apply background remove technique in post processing work and see the magic. Original background can be removed and replaced with any kind of background. Background can changed into white or any color that you want. If you are willing to upload your photo in Amazon, Ebay or other E-commerce site, you can rely on this service without any hesitation. As I said before, it is the proven way to grab attention. When you have attention with you, things will be a lot easier for you to increase your sales. Do you know what the way to remove the background is? There are several ways to remove background from the photo. But all the ways are not so effective to use. Let me make things clear. You will find some automatic tools online that can remove background online just few clicks. But it never can produce accurate result. If you zoom in those pictures, there will be lots of noise and edges. At the same time, picture quality gets low a bit. For business purpose you cannot do these kinds of mistakes. Then what is the most effective way? The best way to perform Background remove is to do it manually by using photo editing software. Which software are most effective to use? There are numerous applications that can help you to remove background. As per my recommendation, it is better to use Adobe Photoshop as it comes with lots of options and flexibility. Skylum Luminar, Corel PaintShop Pro can also be used. Gimp will be the best option when looking for free software. Remove the background manually is the only effective way to remove background properly. But it will cost you lots of time, if you have lots of pictures to edit. It will be tough for you to edit all the pictures by yourself. Taking service from online image editing service provider like Clipping USA can be a smart choice. One more thing, background remove service may not prove to be so perfect in all cases. When the object contains lots of holes and fur, one should apply image masking.  Image Masking It is the perfect replacement for background removal. Without reducing image quality, you can hide the portion that you want. You can highlight the portion that you want to reveal. That is the specialty of this service.
Image masking is specially needed when background removing technique is proving to be not so effective. Image masking doesn’t mean that you are going to remove and replace the background. It can be done in similar background too. It totally depends on user. Do you want to hide some portion of your image and reveal some portion? Then it is image masking that can help you by allowing it to you. Using of masking technique in increasing day by day. In this topic, I am going to give you 5 powerful tips that can help you incredibly to make your image masking better. Let’s get started without any more delay. 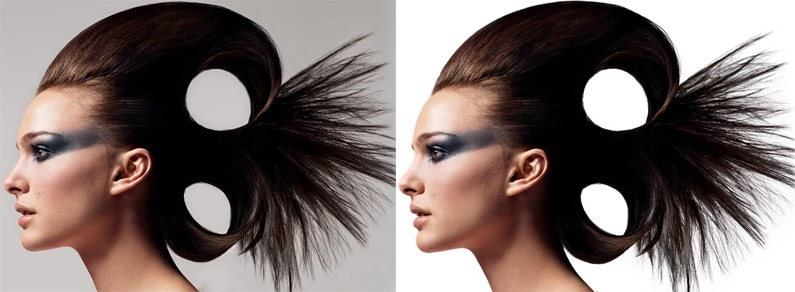 Tip 1: Use Gradient Mask
To do better masking in Photoshop you obviously need to utilize gradient mask. Soft transition can be created in between object and background by suing this tool. The good thing is you can easily use this in a short time. So, people who are looking for something awesome technique to apply in a short time for better masking, Gradient mask will be perfect for them. Tips 2: Using Clipping Mask containing text Do you want to show a picture inside the text? Then you should try clipping mask with text. One just needs to build text and place a photo inside it. To perform this in non-particular way, create new layer and write text place a photo top of it and merge it with previous layer. Tips 3: Use multiple tasks to get a better control Some people question about placing Pixel and Vector Mask on a similar layer. Yes, that is possible. Sometimes, you have to do complex selection like tree with leafs. At this point, it is better to use multiple masks types on the same layer. When you are looking for find and in-depth details it is better to use pixel masks. But if you want sharp and clean edges, you vector masks will be the best option. Tips 4: Add a High Contrast Layer At first, add a copy for safety before you begin. Also make a copy of background layer to keep you one the safe site. In this way, your image becomes totally secured. At the initial stage, build a high contrast layer below the picture that you are masking. It can help you to describe edges much better. It also gives you a view of holes in your mask. Green high contrast mask work will be visible in that way. Tip 5: Refine the edges. This is an essential option to use for a better masking. The good thing is one can utilize this technique both for Magic Wand tool and the Quick Selection Tool. To use this option, go to Main Toolbar and choose refine edge. It will allow you a good control over the edges. After you choose the option it will bring a new box. From there you can control over your image. If you want a feather choose something below 5. You can set it a bit high if you are looking for a smooth result. When you set everything ok, simply press the Enter option from keyboard. This was some powerful tips to improve your image masking. By practicing them, you can make yourself as a professional image edition, when it is about Image Masking. |
 RSS Feed
